Paddocks
Paddocks are a fundamental part of your farm and are what many events are tracked against.
Adding Paddocks
To add a new paddock, follow these steps:
- Go to the farm settings
- Scroll down to the "Paddocks" section
- Click the "Add Paddock" button
- Enter the paddock name/number
- Enter the area of the paddock
- Click the "Create" button
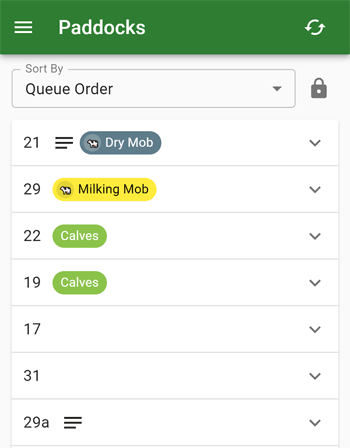
Paddock Queue
The paddock queue is the main view for all paddocks. It shows the list of all paddocks from oldest grazed to most recently grazed. This means the paddocks you should consider grazing next are at the top of the list. You can also move paddocks freely in this list to adjust the order.
Viewing a Paddock
Tapping on a paddock will expand it. In here, you can start a grazing and go to the paddock page.

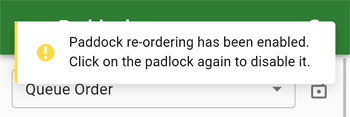
Reordering Paddocks
By default, the queue is locked to prevent accidental changes. To unlock the queue, click the padlock button in the top right corner. This will allow you to drag and drop paddocks to change the order. You will see this message when unlocking:
Move a paddock by clicking and holding on the paddock and dragging it to the desired position.
You can relock the queue by clicking the padlock button again.
Removing a Paddock from the Queue
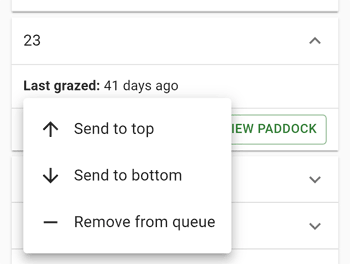
If you have a paddock that can't be grazed (maybe due to crops or other reasons), you can remove it from the queue by expanding the paddock and clicking the three dots at the bottom left. In this menu, you can click "Remove from queue" to remove it from the queue.
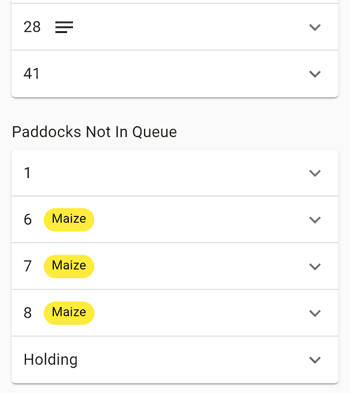
Removing a paddock from the queue will add it to a "Paddocks Not In Queue" section at the bottom of the queue. Paddocks out of the queue can still be grazed, but you will be shown a warning when you do so.
To add a paddock back to the queue, expand the paddock and click the same three dots at the bottom left. In this menu, you can click "Add back to queue" to add it back to the queue - this will add it to the bottom of the queue.
Queue Sort
At the top of the queue, you can change the order that paddocks are displayed in. This is only visual and does not change the order of the paddocks in the queue.
When changing the order to something than queue order, you cannot drag and drop paddocks to change the order.
Viewing a Paddock
Grazing Controls
At the top of the paddock page are the grazing controls. These allow you to start and stop a grazing as well as show the current grazing status.
Tags
The tags section allows you to add tags to a paddock. The section will show tags that are currently applied to the paddock - tapping them will allow you to edit them.
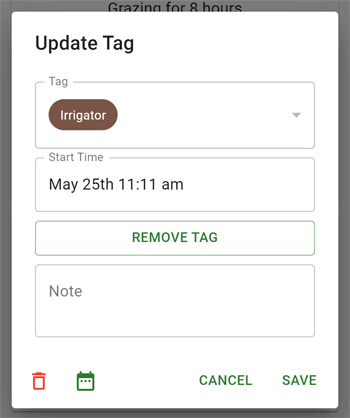
From here, you can:
- Edit the start time by tapping the start time
- Remove/end the tag by tapping the "End Tag" button
- Add a note
- Delete the tag by tapping trash can button on the bottom left
- View the tag on the tag timeline by tapping the calendar button on the bottom left
Once removing a tag, it will no longer display in this section.
Notes
The notes section is a place to add notes about the paddock. These notes are not tied to a tag or grazing.
Details
The details section shows information about the paddock. This includes:
- The size of the paddock (and calculated if a boundary has been set)
- The last grazed date
Grazing History
The grazing history section shows a list of all grazings that have occurred in the paddock.
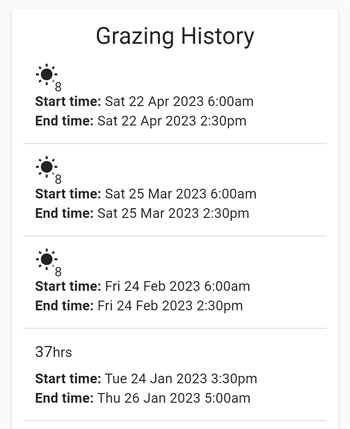
Each block is a grazing which displays the start and end time and the duration.
If the app detects that it was grazed during the day, it will show a sun icon where the grazing duration is, also if the app detects that it was grazed during the night, it will show a moon icon where the grazing duration is.
Tapping on a grazing allows you to edit it. See the Grazing Recording page for more on editing a grazing.
Map
The map section allows you to view and edit the paddock boundary.
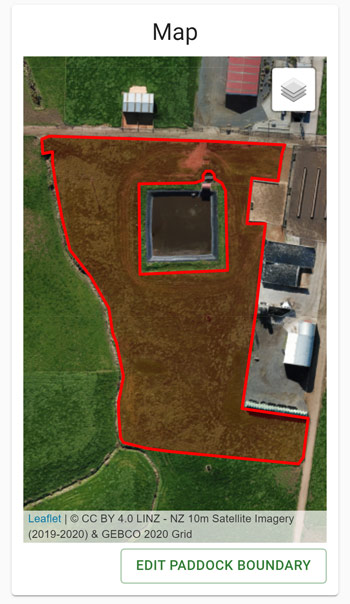
By default the map will not be shown, but clicking "View Paddock Boundary" will show the map (if there is one).
Use a desktop to create and edit paddock boundaries if possible
When creating and updating paddock boundaries, it is recommended to use a desktop computer for a better experience.
Adding a Paddock Boundary
If a paddock does not have a boundary set yet, there will se a single "Add Paddock Boundary" button - click this to start adding a boundary.
To start drawing a boundary, click the plus button in the bottom left corner and then click where you want the first point to be. From here, you can click to add more points to the boundary. To finish the boundary, click the first point again.
If you have something like a pond in the paddock you don't want included, you can create a hole by holding down the ctrl key and clicking where you want the first point of the hole to be. After this, release the ctrl key and click to add more points to the hole. To finish the hole, click the first point again.
When you are finished drawing the boundary, click the "Save" button in the bottom right corner.
Editing a Paddock Boundary
To edit a paddock boundary, click the "Edit Paddock Boundary" button on the paddock page.
Here are some editing tips:
- To delete a point, click on the point.
- To add a point in between to points, click on the faded point on the line between the two points.
- To remove a hole, click on all of its points to remove them.
When you are finished editing, click the "Save" button in the bottom right corner.
Deleting a Paddock Boundary
To delete a paddock boundary, click the "Edit Paddock Boundary" button on the paddock page. In here, click the "Delete" button in the bottom left corner.
Tag History
The tag history section shows a list of all tags that have been applied to the paddock.
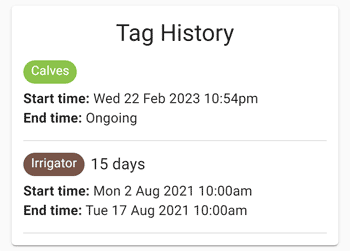
Each block is an applied tag which displays the start and end time and the duration.
Tapping on a tag record allows you to edit it.
Re-add a Tag
If you have accidentally removed a tag and want to use the same record, you can click "Continue applying this tag" to remove the end time.